Showing posts with label windows. Show all posts
NI LAB VEIW Activator

It is a complete NI Lab Veiw Activator,i've tested it on Labveiw 2012 and Labveiw 2013 and it worked successfully with both of them.
Download NI Licence Activator
Incase you need a serial key,click on options,then click GenerateSerial key and copy and use the thus generated key

To activate any available module of labveiw,right click on the particular module and select Activate,


And there you go,your NI LabVeiw Activated for lifetime,
Download IDM BUILD 6.18 Cracked

Download Internet Download Manager 6.18 Build 12
1] Install The App
2] Exit The App from System Tray
3] Copy Content from Crack Folder to Install Directory
[C:\Program Files\Internet Download Manager]
or
[C:\Program Files (x86)\Internet Download Manager]
NI LabVIEW 2013 cracked full version

Download NI LabVIEW 2013 cracked full version
How to get Serial number?
1. Run NI License Actiavtor 1.1
2. Option > Generate Serial...
3. Install...
...
--------------------------
Decline Support for Install Hardware Source
You can install it later
----------------------------
How to activate?
After Full Install.
1. Open Activator 1.1
2. Mouse-right-click on all licenses shown in the activator > Activate.
TuneUp utilities 2014 full version(cracked)

- First Download TuneUp utilities 2014 cracked
- Install it
- After installation is complete,exit tuneUp Utilities
- copy the file from the folder crack which is present inside the folder crack (thats right! crack inside a crack :P ) to the installed folder in your root drive,goto program files (X86) or just program files if you are using a 32 bit system then into tune up utilities folder and replace the file by pasting in it
- now double click the registration.reg file present in the crack folder,thats it!you are done!
Solve LIMITED network connection error

LIMITED network connection error may be caused due to various reasons,but mostly due to an ip conflict or improper ip address configuration.and doing a network troubleshoot may fix that.but what if it doesn't? O_O
Don't worry you are just one command away from getting back your internet.open command prompt and type in
ipconfig/renew

and there you go its fixed!
What have we done?
what we've done is basically simple.we just asked windows to release the old ip address configuration and get a new one.this error can also be fixed if you wait for some time and then connect to your network,the same thing happens,your system would be allotted a new ip address automatically,but we've chose not to wait and manually renew our ip address
NOTE: this trick only works if your limited connection problem is caused due to any ip conflicts.
Installing USBasp Drivers in windows

- First download USBasp drivers and extract them
- Plug in your USBasp programmer,wait till windows tries to install it,in most of the cases,it may fail to
- Before proceeding any further,you would need to disable driver signature verification on windows,just go through that post
- once you are done, open system properties and on the right corner select device manager


- You would see not installed devices under "other devices",USBasp is ours.right click it and select "update drivers"

- Select browse my computer for driver software

- just browse to the extracted folder,remember just the "folder" not into it, and click next

- there you go now your USBasp drivers will be successfully installed :)


For best buy,try Playwithrobots store
Disable Driver Signature Verification on windows
I would be using my windows 8.1 system for demonstration,so first of all mve your mouse to the bottom right corner to open the charm bar,


 I
I


- Choose settings
- Change pc settings,
- Goto update and recovery tab
- open recovery tab
- And in the advanced startup,click the restart now button
I- wait for the system to shutdown and restart again,goto advanced options,then a menu similar to the below image shows up
- Choose start up settings and then hit restart
- And then you will be given a gui with various options like boot in safe mode,eneble low resolution video mode etc etc
- Check if "Disable driver signature Enforcement" is the 7th option in the list,if so hit F7 or the respective function key,then the system proceeds with usual start up,and you've successfully disabled driver signature verification
Windows 8.1 Activator

To Activate windows 8.1, Download windows 8.1 Activator
- Install KMSpico,and then run it

- Click the Activate button (the big red one ) and its done!Now your windows 8.1 is activated.

Tag :
System tweaks,
windows
Get Root access to BlueStacks
Hey guyz! it'z been a while since my last post,so hi again!
so if you have gone through my Emulators post,one of the most interesting thing you will find is the Bluestacks Android App player.yes its fun and comes in handy for those who don't have an android phone,but If your purpose for using Bluestacks is App testing,then at some point of time you would definetly need Root or SuperUser access.Lets see how we can break free Bluestackz from its chains shall we?


so if you have gone through my Emulators post,one of the most interesting thing you will find is the Bluestacks Android App player.yes its fun and comes in handy for those who don't have an android phone,but If your purpose for using Bluestacks is App testing,then at some point of time you would definetly need Root or SuperUser access.Lets see how we can break free Bluestackz from its chains shall we?

- First you need to have a latest version of BlueStacks.If you already have one,then its fine or else get one ( in case you have a old version,just give it a try if the rooting doesn't work then go on and download the newer version )
- once you've installed BlueStacks and its running well,now download the SUpatch pack
- Enable Hidden Folder Visibility
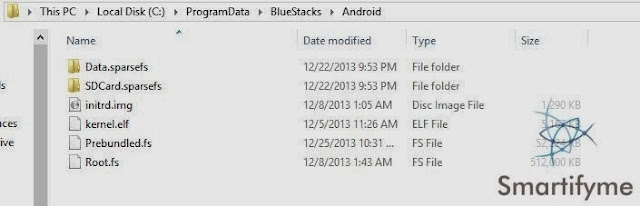
- Now open your c drive > program data > BlueStacks > Android

C:\ProgramData\BlueStacks\Android
- Now backup the two files initrd.img and Root.fs
- Uncompress the downloaded file (the supatch one ) and copy the two files in it to this folder and thats it!you are done rooting!
- TO verify,you whether rooting is done properly or not you can use Root Checker App

- For most of you i need not point of the advantages of having a rooted device,but incase you don't know,just google it ;)
Show Hidden Files in windows
For Windows 8/8.1:

See the hidden items check box in the right?check it
For win7 or lower:

See the hidden items check box in the right?check it
For win7 or lower:
- Open Folder Options by clicking the Start button
, clicking Control Panel, clicking Appearance and Personalization, and then clicking Folder Options.
- Click the View tab.
- Under Advanced settings, click Show hidden files and folders, and then click OK.
(ya that 7 one is straight from Microsoft's site :P )
Tag :
System tweaks,
windows
Windows Search:Search by filesize

Windows search provides you a way to find items based on filesizes,it may not appear to be much useful but its particularly very helpful in some situations like finding out the empty folders or files or even when you want to delete all the thumbnails which come along when you use Image Downloader like extensions and download all the images from a webpage.basically thumbnails can be smaller than 10kb,so you this search by size becomes very useful in such cases.to search by size,all you need to use the below keyword
size:

As you can see in the above image,windows allows only the above fixed sizes to be in the search
Tag :
windows
Run BlueStacks on windows 8.1

Bluestacks app player has got some issues on running in windows 8.1.If you don't know what blueStacks is,try reading our emulators article.
To fix the compatibility issues in windows 8.1,follow the below steps:
First uninstall old version on Bluestacks from your computer.
Now download a fresh version on Bluestacks installer from bluestacks.com (and yes it is updated to jelly bean 4.3 )
once the installer is downloaded,right click on it and extract it using win rar

A folder appears with name blestacks-SplitInstaller blah blah blah open it.then you will find two file.
now right click the exe file and goto its properties

goto compatibility tab and choose run in compatibility mode and set the compatibility mode to windows 8

Now click Apply and then ok and now run the installer and when done,you will have your Bluestacks up and Running

Get Windows 8.1 RTM for Free

The most awaited windows 8.1 RTM is here,to get it visit your windows app store and you'll see a update notification if your windows 8 is genuine.here are some features of windows 8.1 RTM
- Start Button- Windows 8.1 brings the Start button back which opens up the tiled interface. Long pressing the Start button opens up the system controls.
- Desktop mode – Users can now boot their PC with the traditional desktop interface.
- Gesture control – Some of the Windows 8 application can now be started with gesture control.
- Tile sizing – Touch device users can now re-size the blocks in four different sizes.
- Web browsing – Users can now browse different web pages side by side.
You can directly update to windows 8.1 without being charged if your old copy of windows 8 is genuine.no changes will be made to your apps,installed programs and files.
And incase you don't have an activated version of windows 8,don't worry i've just got the right thing for you ;) You can download windows 8 pre cracked and install it or you can get the windows8 Activator and activate your windows 8 pro then visit store to update to windows 8.1
Tag :
windows
Google launches new desktop apps for windows 8


Here’s what you can expect with new Chrome Apps: (Copy + paste from chrome blogs :P )
- Work offline: Keep working or playing, even when you don’t have an internet connection.
- More app, less Chrome: No tabs, buttons or text boxes mean you can get into the app without being distracted by the rest of the web.
- Connect to the cloud: Access and save the documents, photos and videos on your hard drive as well as on Google Drive and other web services.
- Stay up-to-speed: With desktop notifications, you can get reminders, updates and even take action, right from the notification center.
- Play nice with your connected devices: Interact with your USB, Bluetooth and other devices connected to your desktop, including digital cameras.
- Keep updated automatically: Apps update silently, so you always get all the latest features and security fixes (unless permissions change).
- Pick up where you left off: Chrome syncs your apps to any desktop device you sign in to, so you can keep working.
- Sleep easier: Chrome apps take advantage of Chrome’s built-in security features such asSandboxing. They also auto-update to make sure you have all the latest security fixes. No extra software (or worrying) required.
- Launch apps directly from your desktop: To make it quicker and easier to get to your favorite apps, we’re also introducing the Chrome App Launcher for Windows, which will appear when you install your first new Chrome App. It lives in your taskbar and launches your apps into their own windows, outside of Chrome, just like your desktop apps. Have lots of apps? Navigate to your favorite apps using the search box.
Get The New Desktop App launcher for chrome
Hyper -V

In our previous post about Running Multiple Operating Systems Virtually we've seen how we can manage and create new virtual machines,now lets try doing the same with some built in tools of windows 8.Actually Hyper-V is a much broader concept,it allows us to run virtual servers and cloud platforms,but lets just stick to running a private virtual machine for another operating system.
And its alot of strain than simply using a virtual box but no harm in learning isn't it?
Ok before we step further into it first lets see the basic requirements for running Windows Hyper -V
- A X64 based processor or simply a 64 bit system
- Hardware assisted Virtualization ( a processor supporting Virtualization )
- Hardware-enforced Data Execution Prevention
Never mind if you don't know these specifications about your pc,you can find them out simply just search for "system information" and the you would be presented with almost every possible data about your computer,now if you can scroll down a bit you would find the hyper V support details


( sorry for the bad image quality )


If the third option ,Hyper-V virtualization Enabled is set no for your system don't worry it says your system is capable of supporting virtualization but it has been disabled you can enable it by tweaking the bios menu if you don't know how to,google it for your hardware coz it varies from manufacturer to manufacturer.
Now that we know whether our pc is capable of supporting Hyper-V,lets go to the next step.
You need to enable Hyper-V.Goto control panel => Uninstall Programs =>Turn windows Features on or off


Check Hyper-V and click ok and wait for the feature to be added.After a restart you would find two icons related to Hyper-V

- Now click open Hyper-V Manager.on the right side column you would find a new option select it and click New virtual machine


- Give your virtual disk a Name and if you want to you can select the location where the disk files are stored

- Allocate the amount of RAM within the bounds suggested and also check use Dynamic Memory


- Opt Install an operating System from a boot cd and then browse for your iso file

and now you have created your virtual machine successfully,lets try it out

- Click Start

- After the machine have started,click Connect


